
Adding LEDs is a great way to spice up 3D printed models. In my next video I will use a simple circuit to automatically turn on LED when it is dark. Electronics are beyond scope of my youtube channel and I am not an expert so I won’t post a video on my youtbue channel about this circuit. However I can get my head around simple electronics and it can be useful to bring closer the topic.
The simplest LED circuit looks like this:
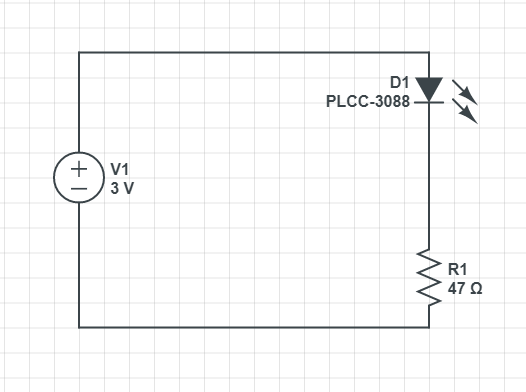
As a power source I use 2 AA batteries in series pack which is 3V. Green LED has forward voltage of about 2.2 V and forward current about 20 mA. To calculate resistor value you can use calculator:
http://led.linear1.org/1led.wiz
In this example the calculated resistance is 47 ohms. It is possible to use greater values to limit the current and power consumption but it can affect the LED brightness.
Next step is to add a simple switch so we can manually turn on and off the LED:
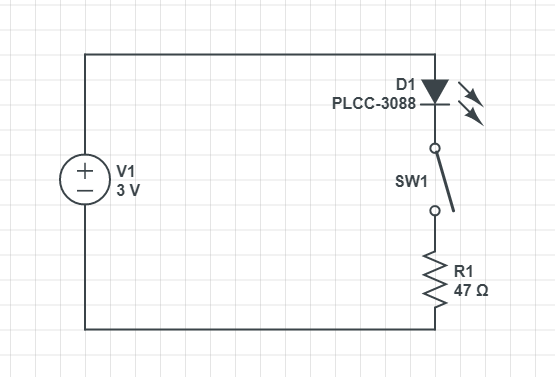
Usually the switch is placed closer to the voltage source. The next step is to replace a switch with a transistor or as in my case with a MOSFET.
MOSFET as a switch
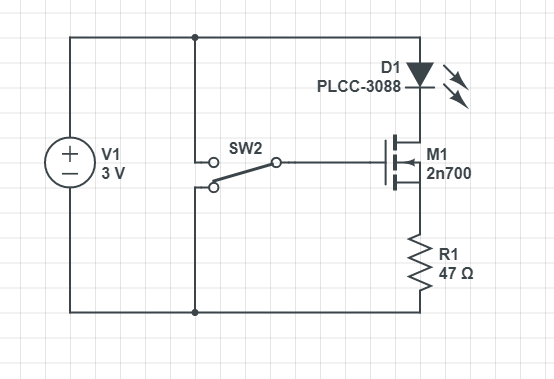
Here I replaced a switch with a 2N700 MOSFET. In this application it is treated as an electronic switch. Depending on your application and source voltage you will probably add a resistor before MOSFET gate (between SW2 and M1).
When switch SW2 connects MOSFET to +3v (up) the LED is on, when connected to ground (down) it acts as a open switch. It can be visually presented like this:
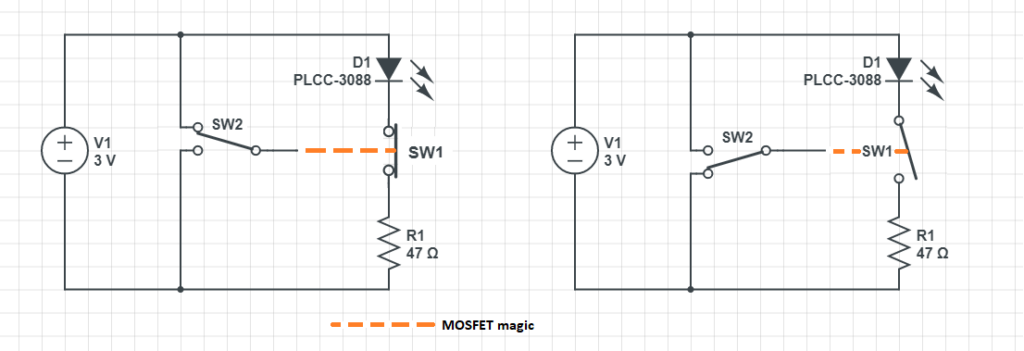
Ok great I replaced a switch with a MOSFET, but I still need to switch SW2 in order to turn the LED on or off. And this is exactly the next and last step.
Phototransistor as a switch controlling LED
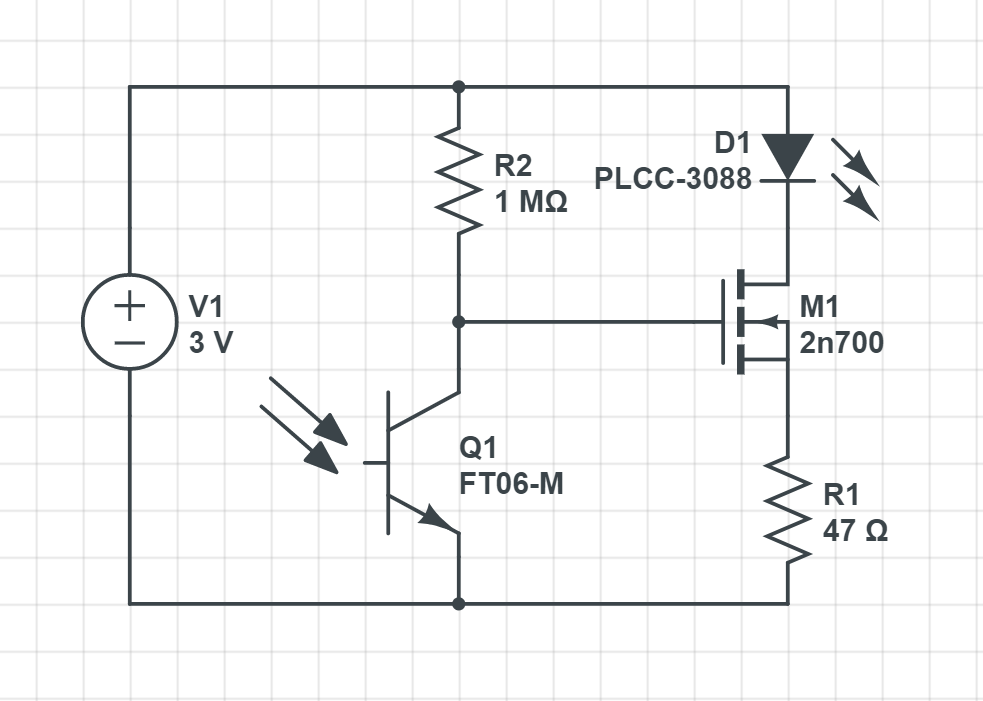
Ok that’s it. I replaced switch SW2 with a 1 MΩ resistor and FT06-M phototransitor now the circuit is ready. When the phototransistor is lightened the MOSFET gate is connected to GND (LED goes off), otherwise to +3V via R2 resistor (LED goes on). You can change R2 value to change the LED switch threshold. By adding a potentiometer in series with R2 you can smoothly control it.
Why MOSFET and phototransitor
FT06-M is rated at max 40mA so you can use it without MOSFET to drive max 2 LED at 20mA each. 2N700 is rated at max 200mA. In my case I am using 5 LEDs which is 100mA and that’s enough to burn the phototransistor.
How long it will last
I use 2 AA batteries which is about 1000-2000 mAh. Let’s assume 1500 mAh. For 5 LEDs and 360 Ω limiting resistor I measured the current with a multimeter:
LED off: 0.003 mA
LEDs on: 0.7 mA
Assuming that every day for 12 hours the LED are on and for 12 hours are off. One day is equal to 12*0.003+12*0.7 ≈ 8.5 mAh power consumption. So about 176 days.
By the way I have no idea why I measured 0.7mA. With single 360 Ω resistor the current for LEDs should be 8.3 mA making the batteries last for about 15 days.
Final word
There are a lot of better sources about ‘MOSFET as a switch’ and phototransitors online where you can find more reliable and in depth information.
Be sure to check my next video were I will use this circuit and add LEDs to Swamp Dragon by Raffo San from My Mini Factory:
https://www.myminifactory.com/object/3d-print-skyrim-swamp-dragon-wall-trophy-72903
i like this perfect article
There is perceptibly a bundle to realize about this. I think you made certain nice points in features also. Rosabel Isacco Lucic
wonderful post, very informative. I wonder why the other experts of this sector don’t notice this. You must continue your writing. I am sure, you’ve a great readers’ base already! Floretta Memmott
We’re a gaggle of volunteers and opening a new scheme in our community. Your web site offered us with useful info to paintings on. You have done an impressive process and our entire community will probably be grateful to you. Jamaal Billington
Enjoyed every bit of your blog. Much obliged. Austin Kravitz
You produce quality content, I appreciate you
You produce quality content, congratulations on this
It is a very good useful article I like to read such articles
It was very useful, I can say it was a useful article for me.
I randomly stopped by your site but you are really successful
I will recommend your beautiful post site to my friends
I like and follow your site, thanks
Very informative blog article.Much thanks again. Fantastic.
I am thinking of visiting your website again Thanks
Thanks again for the article. Really Cool.
I think you have noted some very interesting points , thankyou for the post. Kipp Locke Fowler Sophie Jordon Strickler
swietny art. pozdro
Hi there. I found your website by the use of Google while searching for a comparable matter, your site got here up. It seems to be good. I have bookmarked it in my google bookmarks to come back then. Dorree Ricardo Creath
Excellent post. Keep posting such kind of info on your page. Im really impressed by your site. Meryl Broddy Eugine
You have made some decent points there. I looked on the internet for additional information about the issue and found most people will go along with your views on this web site. Penni Billie Swithbert
Hi there friends, nice post and nice arguments commented here, I am in fact enjoying by these.
Keep this going please, great job!
Greetings! I’ve been following your web site
for a while now and finally got the courage to
go ahead and give you a shout out from Dallas Tx! Just wanted to say keep up
the excellent work!
Pretty nice post. I just stumbled upon your weblog and wished to say
that I’ve truly enjoyed surfing around your blog posts.
In any case I will be subscribing to your rss feed
and I hope you write again very soon!
Hi it’s me, I am also visiting this website regularly,
this site is really nice and the people are actually sharing fastidious thoughts.
Having read this I believed it was rather informative.
I appreciate you taking the time and energy to put
this information together. I once again find myself personally spending a lot of time both
reading and leaving comments. But so what, it
was still worth it!
It’s actually a nice and helpful piece of information.
I am glad that you just shared this helpful
information with us. Please keep us informed like this.
Thanks for sharing.
Nice bro thank you.
Thanks for finally writing about > How to turn on LED when it is
dark – medyk3D – 3D Printing Enthusiast < Liked it!
Hi, just wanted to tell you, I liked this blog post.
It was practical. Keep on posting!
Keep on working, great job!
Appreciate this post. Let me try it out.
Admiring the commitment you put into your blog and in depth information you provide.
It’s nice to come across a blog every once in a while that isn’t the same unwanted rehashed information. Excellent read!
I’ve saved your site and I’m adding your RSS feeds to my Google
account.