
First you need to download and add two libraries keypad and joystick:
https://playground.arduino.cc/Code/Keypad/
https://github.com/MHeironimus/ArduinoJoystickLibrary
Then you can just download my code (it’s zipped):
and upload it to your Arduino Pro Micro.
Let’s go through the code:
#include <Joystick.h>
#include <Keypad.h>
//keypad
const byte ROWS = 6; //four rows
const byte COLS = 4; //three columns
char keys[ROWS][COLS] = {
{'A','B','C','D'},
{'E','F','G','H'},
{'I','J','K','L'},
{'M','N','O','P'},
{'Q','R','S','T'},
{'U','V','W','X'},
};
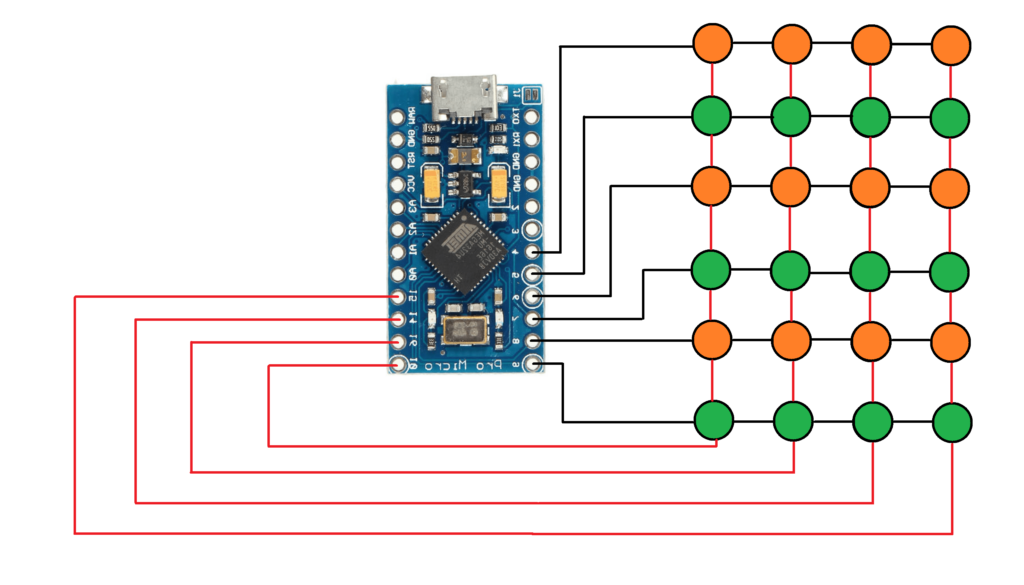
byte rowPins[ROWS] = {9,8,7,6,5,4}; //connect to the row pinouts of the keypad
byte colPins[COLS] = {10,16,14,15}; //connect to the column pinouts of the keypad
Keypad keypad = Keypad(makeKeymap(keys), rowPins, colPins, ROWS, COLS);
// Create the Joystick
Joystick_ Joystick(JOYSTICK_DEFAULT_REPORT_ID,JOYSTICK_TYPE_GAMEPAD,
24, 0, // Button Count, Hat Switch Count
false, false, false, // no X, Y and Z Axis
false, false, false, // No Rx, Ry, or Rz
false, false, // No rudder or throttle
false, false, false); // No accelerator, brake, or steering
void setup() {
//init serial port
Serial.begin(115200);
delay(250);
//Initialize Joystick Library
Joystick.begin();
//add event listener to keypad
keypad.addEventListener(keypadEvent); //add an event listener for this keypad
}
void loop() {
char key = keypad.getKey();
}
void keypadEvent(KeypadEvent key){
Serial.print(key);
switch (keypad.getState()){
case PRESSED:
Serial.println(" pressed");
Joystick.setButton(key-'A',1);
break;
case RELEASED:
Serial.println(" released");
Joystick.setButton(key-'A',0);
break;
}
}First the two libraries (keypad and joystick) are included using #include.
Then the keypad variables are declared and setup.
In my case I use pins 9,8,7,6,5,4 for rows and 10,16,14,15 for columns. The keys matrix is set to have letters from ‘A’ to ‘X’. Later I will translate them to joystick button numbers. This is how the keypad works: when the button is pressed the library calls an event named in my case: ‘keypadEvent’. In parameter of this event the pressed button char is passed. So it can be letter from ‘A’ to ‘X’.
The joystick variable constructor allows to set all kinds of features. It is really important to turn off all the not used features. At first I used default empty constructor and as a result my arduino was randomly steering right or left.
Setup method:
I added serial port initialization, it can be removed (I just used it to debug purposes). And setup the joystick and attached an event to the keypad.
Loop method:
Just calling keypad.getKey() so we can retrieve pressed button.
keypadEvent event handler:
After checking the button state (pressed or released) I am setting the joystick state to 0 or 1. Because the joystick button number is an integer from 0 to 24 and keypad uses chars. I am simply extracting ‘A’ from the key (you can check ASCII Table for the values). If first button is pressed which is mapped to ‘A’, then the value ‘A’-‘A’ = 65-65 = 0 is used. For ‘C’: ‘C’-‘A’=67-65=2 is used.
Connection diagram:
Watch the full video:
Download here:
One comment
Comments are closed.